
Most people who give up on sharpening don’t fail because the stone was wrong. They fail because they can’t hold the same angle stroke after stroke. The edge gets rounded, the knife cuts worse than before, and the sharpener goes back in the drawer for good.
So a beginner’s sharpener has one job above all others: hold the angle for you. Rolling sharpeners do it with a magnet, guided systems with a clamp, pull-throughs and electrics with fixed slots, and a good beginner whetstone with a guide you can feel. Pick the type that matches the knives you own and how much time you’ll actually give it, and the results are good from the first session.
For a kitchen full of ordinary knives, my first choice is The Original Tumbler Rolling Knife Sharpener. If you’d rather spend very little and be done in seconds, get the Work Sharp Pull Through Kitchen Sharpener.
My Top 7 Beginner Knife Sharpener Picks

The magnet holds the knife at 15 or 20 degrees, you run a diamond wheel over the edge, then switch to the honing wheel. There’s no angle to hold and nothing to learn beyond that, which is exactly what a first sharpener should feel like.

The pull-through I’d hand to someone who wants sharp knives tonight. It uses diamond, not carbide, so it grinds the edge instead of tearing it.

For a beginner with both German and Japanese knives: separate 15 and 20 degree slots, diamond abrasives and guides that do all the positioning.

For beginners who want to learn the real skill. The built-in angle guides at 15, 17, 20 and 22 degrees take the guesswork out of the first few sessions.
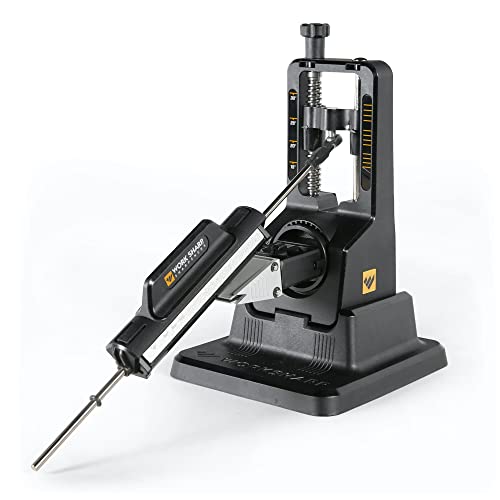
Clamp the knife, set any angle from 15 to 30, and sweep the abrasive across. Whetstone-quality edges with almost no skill, on kitchen and pocket knives alike.

A tiny pull-through with diamond and ceramic rods and three preset angles. It lives in a tackle box or glovebox and fixes a dull pocket knife in a few strokes.

The habit that saves beginners the most sharpening. An angle-guided ceramic rod for a few quick passes before you cook.
Beginner Sharpeners Compared
| Sharpener | Type | Angle | Abrasive | Best for |
|---|---|---|---|---|
| The Original Tumbler | Rolling | 15 or 20 degrees | Diamond, steel hone | Kitchen knives, no learning |
| Work Sharp Pull Through Kitchen | Manual pull-through | Fixed | Diamond | Quick fixes on a budget |
| Chef’sChoice AngleSelect | Electric | 15 and 20 degrees | Diamond, stropping disks | Mixed German and Japanese knives |
| Sharp Pebble Complete Kit | Whetstone | Guides at 15, 17, 20, 22 | 1000/6000 water stone | Learning to sharpen properly |
| Work Sharp Precision Adjust | Guided clamp | 15 to 30 degrees | Coarse to fine | Kitchen and pocket knives |
| Smith’s 50917 Adjustable 2-Step | Handheld pull-through | 15, 20 or 25 degrees | Diamond, ceramic rods | Pocket, hunting and fillet knives |
| Work Sharp Ceramic Honing Rod | Honing rod | Guided | Ceramic | Upkeep between sharpenings |
1. The Original Tumbler Rolling Knife Sharpener: Best Overall
Who it’s for: home cooks with ordinary chef’s, santoku and utility knives who never want to learn a whetstone.
Rolling sharpeners solved the beginner’s angle problem in a clever way. The knife sticks to a magnetic block that has a 15 degree side and a 20 degree side, so the angle is set before you start. You then roll a wheel with a diamond-plated disc along the edge until you feel a small burr, and switch to the stainless steel helix disc to hone it off. Your hands only push the roller back and forth.
That’s why I put it first for beginners. A pull-through is faster, but this treats the knife more gently and gives you a choice of angle: 20 degrees for German and most American knives, 15 for Japanese ones. It’s also hard to do damage with it, which matters when you’re learning on a knife you like.
The usual gripe from Tumbler owners is how long it takes on a badly worn or chipped knife, because a fine diamond disc rebuilds a blunt edge slowly. It also can’t do serrated or single-bevel knives, and a full bolster at the heel makes the last inch of the edge hard to reach.
Key specs
- Type: rolling sharpener with magnetic angle block
- Angles: 15 and 20 degrees
- Discs: diamond-plated sharpening disc, stainless steel helix honing disc
- Finish: wood
Pros
- Angle is fixed by the magnet, not your hands
- Gentler on blades than pull-through slots
- Covers both German and Japanese angles
Cons
- Slow on very dull or chipped knives
- No serrated or single-bevel knives
- Costs more than any pull-through
My verdict: the sharpener I’d give a beginner who cooks every day. If you want something cheaper and faster for occasional use, the Work Sharp pull-through is the better fit.
2. Work Sharp Pull Through Kitchen Sharpener: Best Budget
Who it’s for: beginners who want sharp kitchen knives in a minute and won’t think about sharpening otherwise.
Pull-through sharpeners have a bad name, mostly because of cheap carbide slots that scrape metal off and leave a ragged edge. Work Sharp built this one with diamond abrasives instead, which grind the edge evenly, and I think that’s the difference between a pull-through that slowly ruins knives and one that’s fine to use.
It has two angle-guided stages: coarse to bring back a dull edge, fine to refine it. Use a few light pulls in the coarse slot when a knife has properly lost its edge, and the fine slot for regular touch-ups. Work Sharp also lists it for serrated knives and shears.
The trade-off is control. Work Sharp doesn’t publish the angle, and you can’t change it, so every knife gets the same edge. That’s fine for German and budget kitchen knives; soft-steel brands like Cuisinart, covered in my Cuisinart sharpening guide, are exactly what it suits. I wouldn’t put a thin, hard Japanese knife through it; those deserve a whetstone, a guided system or the 15 degree side of the Tumbler.
Key specs
- Type: manual pull-through, 2 stages (coarse, fine)
- Abrasive: diamond
- Angle: fixed, angle-guided slots
- Works on: chef, paring, utility and serrated knives, shears (per listing)
Pros
- Diamond, not carbide: smoother edge, less damage
- Needs no skill at all
- Small enough to keep by the cutting board
Cons
- Angle isn’t published or adjustable
- Not for hard Japanese knives
My verdict: the cheapest sharpener I’m happy to recommend for kitchen knives. Skip it if most of your knives are Japanese.
3. Chef’sChoice AngleSelect Electric Sharpener (15 and 20 Degree): Best Electric
Who it’s for: beginners with a mix of German and Japanese kitchen knives who want the job done by a motor.
An electric sharpener is the most hands-off way to sharpen. The guides position the blade, the motor spins the abrasive, and you only draw the knife through at a steady pace. This Chef’sChoice model adds the thing most electrics lack: separate slots for 20 degree European and American knives and 15 degree Asian-style knives, so a German chef’s knife and a Japanese santoku each keep the right edge.
Every sharpening stage uses diamond abrasives, and the final stage uses flexible stropping disks to polish the edge. It also takes serrated knives. Chef’sChoice backs it with a 3-year limited warranty.
The one rule beginners need to learn is restraint. A motor removes steel fast, so save the coarse stage for a knife that won’t cut a tomato any more, a few times a year, and the finer stage in between. It’s also big (about 12 by 6 inches) and stays on the counter or in a cupboard, not a drawer.
Key specs
- Type: electric
- Angles: 15 and 20 degrees
- Abrasives: 100 percent diamond, flexible stropping/polishing disks
- Knives: straight and serrated
- Size: 12 x 6.2 x 6.4 inches; 3-year limited warranty
Pros
- Right angle for German and Japanese knives
- Fastest way to restore a dull edge
- Polished finish from the stropping stage
Cons
- Removes steel quickly if overused
- Bulky for a small kitchen
My verdict: the electric to buy if your block holds both German and Japanese knives. If all your knives are German, a simpler sharpener will do.
4. Sharp Pebble Complete Whetstone Kit 1000/6000: Best First Whetstone
Who it’s for: beginners who want to learn real whetstone sharpening, or who own Japanese knives they care about.
Every knife you own can be sharpened on a whetstone, and the skill is easier to pick up than its reputation suggests. What makes this kit good for a first-timer is the angle guide built in, with settings at 15, 17, 20 and 22 degrees. It gives you a physical reference for the angle, so your first sessions build the right habit instead of a rounded edge.
The stone is a 1000/6000 combination, which I think is the right first stone. The 1000 side does the real sharpening on a dull home knife, and the 6000 side polishes the edge afterwards. Water is all it needs, so there’s no oil mess, and the non-slip base keeps it from sliding on the counter.
It’s still a skill, so expect your first two or three sessions to be slow. Water stones also wear unevenly over time and need flattening every few sessions. If that sounds like too much, the Precision Adjust gives whetstone-quality edges with the angle locked for you.
Key specs
- Type: water stone, use with water only
- Grit: 1000/6000 combination
- Angle guides: 15, 17, 20 and 22 degrees
- Includes: non-slip base
Pros
- Teaches a skill that works on every knife
- Built-in angle guides for consistency
- Right grits for a first stone
Cons
- Slow at first; needs practice
- Stone needs flattening over time
My verdict: the best way into whetstone sharpening. Choose a rolling or pull-through sharpener if you just want sharp knives without learning anything.
5. Work Sharp Precision Adjust Knife Sharpener: Best Guided System
Who it’s for: beginners with a mixed collection of kitchen and pocket knives who want excellent edges without freehand skill.
A guided system is the halfway point between a gadget and a whetstone. The Precision Adjust clamps the knife in a vise, you dial in an angle between 15 and 30 degrees, and the abrasive rides on an arm that keeps that angle on every stroke. The result is an edge as clean as a good whetstone gives, with the wobble taken out.
That angle range is the reason it suits mixed collections. Set 15 for a Japanese gyuto, 20 for a German chef’s knife, 25 for a pocket knife, and each one keeps the geometry it was made with. The kit goes from coarse to fine in one setup, handles serrated edges, and needs no power.
It takes longer than everything above it, and the first session involves reading the instructions. Long kitchen knives need a little care near the tip as you sweep along. Once it’s clamped, though, a beginner gets results that would take months to learn on a stone.
Key specs
- Type: manual guided system with clamp
- Angle: adjustable, 15 to 30 degrees
- Abrasives: coarse to fine, in one setup
- Knives: kitchen, pocket, hunting, fillet and serrated
Pros
- Any angle from 15 to 30, held for you
- Whetstone-quality edges with little skill
- Covers kitchen and outdoor knives
Cons
- Slower than rolling or pull-through sharpeners
- Needs a short setup and learning session
My verdict: the best edges a beginner can get. To see how it stacks up against other sharpener types, my best knife sharpener guide puts them side by side.
6. Smith’s 50917 Adjustable 2-Step Sharpener: Best for Pocket Knives
Who it’s for: first-time pocket, hunting and fishing knife owners who want a sharpener that goes everywhere with the knife.
Outdoor knives go dull where there’s no counter or whetstone. This Smith’s sharpener weighs under 2 ounces and fits in a pocket, and it’s adjustable: crossed diamond rods and crossed ceramic rods, each set to 15, 20 or 25 degrees. Pick 20 or 25 for most pocket and hunting knives, 15 for a thin fillet knife.
The diamond slot restores a dull edge in 3 to 4 strokes, and the ceramic slot finishes it or touches up a knife that’s still fairly sharp. Rods are kinder to an edge than the carbide slots in most cheap field sharpeners, and the rubber feet keep it steady on a tailgate. I’ve written about using Smith’s sharpeners properly in my Smith’s sharpener guide.
It’s a pull-through, so the edge won’t match a guided system, and it’s too small to be comfortable with a long kitchen knife. As a first outdoor sharpener, it’s hard to beat.
Key specs
- Type: handheld pull-through, 2 stages
- Abrasives: crossed diamond rods (coarse), crossed ceramic rods (fine)
- Angles: 15, 20 and 25 degree presets
- Size: 3 x 2.62 x 1.14 inches, under 2 oz, lanyard hole
Pros
- Three angles cover pocket, hunting and fillet knives
- Diamond and ceramic rods, no carbide
- Small enough for any pocket or pack
Cons
- Pull-through edge, not as refined as a guided system
- Awkward with long kitchen knives
My verdict: the sharpener to keep with a pocket or hunting knife. At home, the Precision Adjust gives the better edge.
7. Work Sharp Kitchen Ceramic Honing Rod: Best for Keeping It Sharp
Who it’s for: any beginner who has just sharpened their knives and wants them to stay that way.
Here’s what nobody tells beginners: most knives that feel dull aren’t worn out, the edge is just bent over. Honing pushes it back straight in a few seconds, and it means you sharpen far less often. That makes a honing rod the most useful second purchase after any sharpener above.
I prefer ceramic to a grooved steel for beginners. Ceramic realigns the edge and removes a trace of metal, and it’s safe on both German and Japanese knives. Work Sharp adds an angle guide at the handle, which takes care of the part beginners struggle with on a traditional rod. Work Sharp lists serrated knives as well as the usual chef’s, santoku, paring and utility knives.
A rod can’t fix a knife that’s truly dull or chipped; that still needs a sharpener. Ceramic is also brittle, so it can crack if it falls on a hard floor.
Key specs
- Type: ceramic honing rod
- Guide: built-in angle guide
- Knives: chef, santoku, paring, utility, serrated
Pros
- Angle guide makes honing easy to get right
- Ceramic is safe on German and Japanese knives
- Seconds per use
Cons
- Won’t fix a really dull or chipped edge
- Can break if dropped
My verdict: buy it alongside whichever sharpener you choose. It’s the cheapest way to make a sharpening last.
How to Pick Your First Sharpener
Start with your hardest knife
Choose the sharpener that suits the hardest knife you own. A hard Japanese knife needs a 15 degree option and a gentle abrasive (rolling, guided, whetstone or the AngleSelect). If all your knives are German or budget kitchen knives, any pick here works.
Fixed angle beats skill
Pick a sharpener that holds the angle, because a wobbling angle is why first attempts fail. The magnet, clamp, slot or built-in guide is doing the hard part; your job is light pressure and patience.
Diamond or ceramic, not carbide
Avoid carbide-only pull-throughs. They work fast but scrape steel off in a way that leaves a rough edge and shortens a knife’s life. Diamond sharpens any steel cleanly, and ceramic finishes and touches up.
Match it to your patience
Be honest about time. If you’ll never spend more than a minute, buy the pull-through or the electric. If you’ll give it 15 minutes every few months, the Tumbler or Precision Adjust gives a better edge. If you want sharpening as a skill, start on the whetstone.
Serrated knives need their own plan
Check serrated support if you own a good bread knife. The pull-through, AngleSelect, Precision Adjust and ceramic rod all handle serrations in some way; the Tumbler and the whetstone don’t.
Your First Week With a New Sharpener
- Test before you start: try slicing a sheet of paper or a tomato. My guide on how to tell if a knife is sharp enough shows the quick tests. Note where the edge snags.
- Hone first: a few passes on the rod often fixes a “dull” knife on its own. Test again.
- Practice on a cheap knife: your first full sharpening should be on a knife you won’t miss, not your best one.
- Use the marker trick: color the edge bevel with a marker, sharpen a few strokes, and look. If the ink is gone evenly, the angle is right.
- Feel for the burr: sharpen until a tiny rough lip forms along the whole edge on the opposite side, then switch to the fine stage or disc to remove it.
- Use light pressure: let the abrasive do the work. Pressing harder only rounds the edge.
- Test again, then hone through the week: a few strokes on the rod before cooking keeps the new edge going for weeks.
After that first week, hone every few uses and sharpen only when honing stops helping, which for most home cooks is every two to four months.
FAQ
What is the easiest knife sharpener to use?
A diamond pull-through like the Work Sharp Pull Through Kitchen is the easiest: you just draw the knife through the slots. A rolling sharpener like the Tumbler is nearly as easy and gentler on the blade.
Should a beginner use a whetstone?
Yes, if you want to learn. A 1000/6000 stone with a built-in angle guide, like the Sharp Pebble kit, gets most people sharpening well within a few sessions. If you only want sharp knives, a fixed-angle sharpener is quicker.
Are pull-through knife sharpeners bad for knives?
Carbide pull-throughs are hard on knives, especially if used often. Diamond or ceramic pull-throughs are much gentler, and they’re fine for German and budget kitchen knives if you use the coarse slot only when the knife is really dull.
What angle should I sharpen my knife at?
German and most American kitchen knives take roughly 20 degrees per side; Japanese knives take about 15. Pocket and hunting knives usually sit around 20 to 25 degrees.
How often should I sharpen my kitchen knives?
Every two to four months for most home cooks, with honing every few uses in between. When a few honing strokes stop reviving the edge, it’s time to sharpen.
Can I ruin a knife with a sharpener?
You can wear one down faster than needed by using a coarse stage too often or pressing too hard, and carbide slots can chip thin Japanese edges. Light pressure, the right angle and coarse grits only when dull keep a knife going for decades.
Final Verdict
For most beginners, The Original Tumbler is the one I’d buy: the magnet holds a 15 or 20 degree angle, the diamond disc is gentle, and there’s nothing to learn. The Work Sharp Pull Through Kitchen does a good job for very little money on German and budget knives, and the Work Sharp Precision Adjust gives the best edges if you’ll spend a few extra minutes. Whatever you choose, add a ceramic honing rod.
Own Japanese knives? My guide on how to sharpen Shun knives walks through the whetstone steps for thin, hard edges.

Gary Portman founded knivesadvice.com in 2019. He learned to cook in his family’s kitchen as a kid and has used kitchen, pocket and outdoor knives ever since, from paring and fillet knives to survival blades he carries camping and hiking. He writes the site’s buying guides, brand reviews and sharpening how-tos to help readers find the right knife for the job. More about Gary.